Recent Lightroom Articles

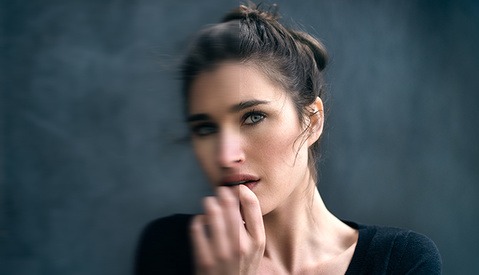
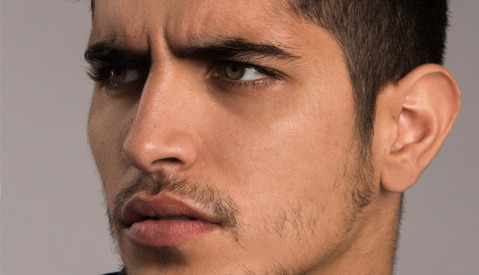
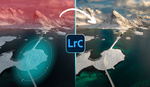
How to Create That Urban High Contrast Desaturated Look in Lightroom

One of the more popular styles on Instagram is urban photography that sports a high contrast look with some desaturated colors. When trying to reproduce this look though, a lot of people run into problems. When adding contrast to an image, oftentimes the colors become more saturated, which is the opposite of what is needed for this look. When you try and use the saturation slider to fix the problem, you end up taking out some of the color that you need for the image.

How To Upload High Quality Photos to Facebook And Fix A Common Mistake

We've all been there, we work so hard preparing, shooting, editing or whatever it may be when we're involved in taking photos. After everything is finished and the photos look amazing, we cannot wait to share our photos to the world. But are they the highest quality possible?

Adobe's Explosive Profit Boost Could Help It Give Creatives the Leg Up They've Been Begging For

Adobe’s last quarter results are out, and they’re better than ever. Adobe’s Creative Cloud and media business rose 35 percent thanks to a 23 percent beat on subscriber expectations, while the company’s overall net income more than doubled from $88.1 million to a staggering $222 million. Adobe’s fourth-quarter earnings report shot its stock to all-time highs. On one hand, that’s good business. But what does this mean for creatives who have felt an increasingly rocky relationship with the software giant?

3 Basic Editing Tips with Before and After Images

Ever since the middle of high school, I've been immensely interested in "the process." You know, that middle bit between point A and point B that nobody but the artist ever sees. I've always loved peeking behind the scenes to see where something started and what kind of work and thought went into creating the finished product. To satisfy those of you who are just like me, here's the second post in my before/after series which not only shows you my images straight out of camera and the final product, but which uses each image to explain a bit more about what I do in post. If you want to dig in way further than these, I cover every step of my post processing in my Editing + Consistency class. Enjoy, friends!

Lightroom 2.1 for Mobile Now Available

Adobe released today the version 2.1 of Lightroom for mobile devices. It comes with a bunch of interesting new features making full use of the possibilities offered by iOS 9 and the iPad Pro. Some of the new features also could make one think that Adobe is becoming serious about making great apps for mobile devices.

Lightroom Film Presets: Full Totally Rad Replichrome I, II, and III Review

Totally Rad are the producers of the film emulation presets titled Replichrome. Currently there are three sets of presets, Replichrome I: Icon, Replichrome II: Slide, and Replichrome III: Archive. The initial inception of the Lightroom presets, now known as the Icon Series, came with the intent to get it right. Not to create stylized versions of film but to create accurate depictions so that the digital images with the film presets would appear as close to actual film as possible.

Which Mobile Photo Editor Is Right for You?

I think the only thing that has changed photography more than the invention of digital cameras is the ever-growing involvement of photography and social media. Sites like Instagram, Twitter, and Tumblr are the perfect platforms for sharing not only your work, but also behind-the-scenes images and other content that draws interest towards your brand. Today it is easier than ever to take advantage of this. Not only have mobile apps changed the shape of the industry, but they have changed the way that photographers can work. Apps like Snapseed, VSCO, and Lightroom Mobile have made it possible for aspiring artists, or even those in a hurry, to create incredible content with relative ease.

Astropad Mini Updated to Support 3D Touch, Now Has Pressure Sensitivity and Is Free

Astropad Mini, the app that allows iPhone and iPad users to turn their device into a graphics tablet for the Mac, received a major update on Tuesday. The app now includes support for Apple's 3D Touch, meaning it can now recognize 256 levels of pressure, bringing it even closer to turning your iPhone into a fully functioning graphic tablet.

How to Do Web Culling in Lightroom

Lightroom does some things really well, but one area I always wished I had more control over was web culling. After some investigation, here's the best method I've found for efficiently sending out photos for clients to peruse and select.

Why I Switched From Lightroom to Capture One for Wedding Editing

Capture One has been known amongst high-end retouchers and commercial photographers for quite some time, the main reasons probably being its powerful tethering and color editing tools. Wedding photographers seem to think Capture One is not tailored to suit their needs. At least, that is what I thought. After a full year using only Capture One to process my raw files, I wanted to share with you why I stopped using Lightroom.

Adobe to Issue Another Update to Lightroom, Bring Back Features

Great news for Lightroom users: today, Adobe announced another update to the program, confirming that they will be reinstating the old Import dialog, which was replaced by a newer dialog that received harsh criticism for its excessive simplicity and removal of features.

Adobe Issues Lightroom Update and Apology to Address Crash Issues

After Monday's release of Lightroom, many users were upset to find the release had seen changes that removed features and worse, had a tendency to crash, rendering it essentially unusable. Today, Adobe has released an update that corrects the crash issue, as well as an apology.

Adobe Faces Harsh Backlash After Removal of Features and Stability Issues Plague Lightroom 2015.2/6.2

Many photographers recently upgraded to the newest version of Lightroom, only to have their work come grinding to a halt as the program became completely nonfunctional. Others found their standard workflow disrupted by the removal of longtime features. Either way, many are very displeased with the latest update and have taken to the Internet quite vocally to make their concerns known.

Adobe Announces a Slew of Updates to Its CC Desktop and Mobile Products at Adobe MAX 2015

Every year's Adobe MAX conference marks the an obvious time to expect updates throughout Adobe's product lineup. So what's different this time? Mobile. Adobe has the monopoly in the area of creative applications for media editing, but for the first time in a while, it feels like they're competing with some unknown entity. This year's updates bring so many new features across the widest range of Adobe products ever that there's no doubt they're serious about their making customers happy with a huge concentration on mobile.

How to Post Process the Night Sky in Lightroom

Creator and editor of Lonely Speck, pro night sky photographer Ian Norman is back with another great tutorial. Being nothing short of passionate when it comes to astrophotography Ian always seems eager to share what he has learned over the years. In his latest video Ian gives us the rundown on how he post processes Milky Way photos in Lightroom.

A Tutorial on How to Create RAW Panoramaic Images in Lightroom

Watch as photographer/retoucher Simon Plant walks us through one of Lightroom's coolest new features, RAW panoramic stitching. In this video Simon takes us step by step as he stitches two images together to make a panoramic image, which can then be processed with all that benefits of a RAW file. We now, no longer, need to process our images prior to stitching them in Photoshop thanks to this easy and convenient new feature.

Lightroom Dashboard Is Analytics for Your Camera Gear and Images

If you’ve ever wanted to know just how many photos you typically shoot in August, or how often you’re really using each lens in your bag, or what seems to be your go-to aperture, there is a free web-based tool that can show you. With Lightroom Dashboard, you simply drag and drop your Lightroom catalog into the browser and get back all sorts of analytical data including those just mentioned plus more.

How to Get The New Dehaze Tool In Lightroom 6

So you bit the bullet and invested in Lightroom 6. Then Adobe announced their new Creative Cloud program and you decided you would stick with Lightroom 6 until there were new features added that could justify the jump to that monthly payment plan. Well now there is this fancy new tool called the dehaze tool. It looks to be pretty great, but it doesn’t really justify the jump from something you own outright, to a monthly payment. Lucky for you there is now a free way to add the dehaze tool to Lightroom 6.

Everything You Need to Know About Capturing Sharp Photographs in Any Situation

Some photographers like that soft, ethereal feel as they specifically seek out types of plastic to stick in front of the lens, or even go so far as to buy defocus control lenses and LensBabies that will allow them to distort an otherwise true image. That has its value. But this isn’t for that. This is the new go-to guide for absolutely everything to know about how to get your images to be tack sharp. Get ready to dive in: this is a no-questions-left-behind study on sharpness.

Adobe Lightroom on Android Receives Update, Adds Copy and Paste for Image Adjustments and New Crop Tool

Adobe has updated their image management and editing software Lightroom Mobile for Android devices. First debuting on Android in January, the Lightroom companion app allows users to sync photos between the desktop version and edit on the go with their mobile devices. In Version 1.2, the team has added a few new features and made several fixes that should improve a user’s overall experience.

Quickly Fix Red Flushed Skin Within Lightroom

It’s officially hot outside in my neck of the woods, but that doesn't mean I can to take a break from shooting outside! I still have to sweat it out, hauling my gear around from location to location and that means my clients have to feel the sting of the summer heat as well. Although it’s steaming out, I don’t want my images to look like they were taken inside the nearest oven set to broil. Thankfully, there is a super quick and easy way to fix those heat flushed skin tones.

Dramatic Beauty Portrait Tutorial Part 3: Basic Skin Retouching

In Part 3 of the Dramatic Beauty Portrait Tutorial, we will finally get into the first main step of the skin retouching process. Basic skin retouching involves addressing subtle skin and texture issues on our portrait images. We will not only look at techniques for skin retouching in Photoshop, but also discuss the theory behind our decision process during the retouching process. I will also show optional techniques for those looking for quicker or alternative options during their portrait or beauty retouching. In case you missed it, during Part 1 of the tutorial we went over the lighting and shooting of our image and in Part 2 we looked at the "pre-editing" process.

How to Easily Create a Tasteful HDR Image Using Photoshop

A lot of people associated HDR with over-processed, surreal images. This is not always the case. Shooting HDR can be very useful in different circumstances. It is often seen in real estate and landscape photography and can be very useful to balance a wide range of light levels. There are many programs out there for merging images together to create an HDR photo, but one of the simplest ways to create these dramatic photographs is using Photoshop's built-in HDR Pro.

Dramatic Beauty Tutorial Part 2: Preparing Your Image for Retouching Using Lightroom and Camera Raw

In Part 1 of our Dramatic Beauty Portrait Tutorial, we looked at the lighting setup, gear breakdown, and shooting of our dramatic beauty shoot. In Part 2 of the tutorial we will now look at two different ways of exporting and preparing your image for retouching. The first method involves creating versions in Lightroom and exporting directly to Photoshop. The other method utilizes Adobe Camera Raw and the ability to make variations within Photoshop. I will also discuss the overall goal of our pre-edit stage.

Dramatic Beauty Portrait Tutorial Part 1: Complete Lighting Setup and Gear List

This is Part 1 in what will be an 8 part series for a dramatic beauty portrait. In the series of tutorials, we will go through everything from the gear used, to the lighting setups, and all the way through the complete retouching process. In Part 1, I will breakdown my gear list used for the shoot and I will thoroughly go through my lighting setup. In this video tutorial not only will you see the gear and setup, but also a behind the scenes look as me and my team go through hair, makeup, and shooting. The complete series of videos will be available here on Fstoppers and on my YouTube Channel.

The Fastest Way To View And Cull Thousands Of Raw Photos Is Now 100% Free For Fstoppers Readers

Lightroom has become the industry standard for editing images quickly but when it comes to viewing and culling images, it's still incredibly slow. On1 has recently launched Perfect Browse 9.5 as the fastest way to burn through hundreds or thousands of raw files and then import your favorites into Lightroom for editing. Oh, and did I mention, it's totally free for Fstoppers readers right now.

As a wedding photographer, I tend to shoot thousands of images at a time. Before I can edit anything, I need to go through each image one by one, delete the bad ones, and figure...

Editorial Fashion Shoot: A Complete Gear List

I will soon be releasing a start-to-finish retouching tutorial video here at Fstoppers on my most recent fashion editorial photoshoot. But before I do, I wanted to start warming our readers up with a complete gear list. In this article, I share with you everything I used on my shoot, the breakdown of costs, and where to find all the gear and extras: from the Profoto Strobe all the way down to the gaffer tape.

Simple Men's Portrait Retouching Workflow

As I spend more and more time around other photographers, I’ve had the opportunity to sit back and listen to everyone’s take on what makes a retouched image successful. Some photographers spend minutes retouching, while others spend literally hours on an individual image. Regardless if you spend 15 minutes or 3 hours retouching in image, it’s important to have a strong workflow so that you maintain your sanity.