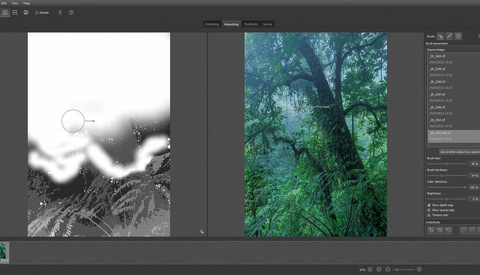
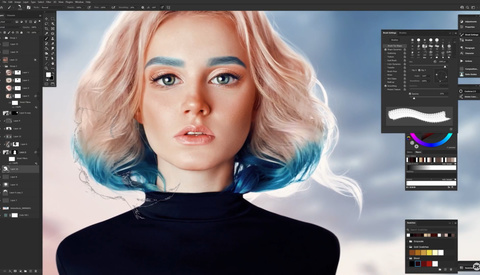
Recent Post Production Articles

The Best Way to Change Color in the Latest Version of Photoshop

Just like everything in life, Photoshop techniques change or require slight adjustments. What may have been perfect two years ago might not necessarily be perfect now. And so it is with changing colors of objects in Photoshop. Here is the latest on how to do it effortlessly.

How to Add Light Rays to Your Images in Adobe Photoshop

If you're open to more heavy-handed retouching of your images, you have almost limitless possibilities of what you can do with even the blandest of images. In this tutorial, learn how to create realistic light rays and dappled light to add some atmosphere to a photograph.

How To Sharpen Eyes In Your Portraits To Make Them Pop

When looking at portraits, we have a tendency to look at the eyes first. We can't help it, it's part of human nature. This is why I personally believe it is extremely important to capture and refine the eyes in your photos to create more engaging portraits. Retoucher Michael Woloszynowicz created an awesome 4 part video series about how to make your eyes look amazing in post production. See the rest of the post below to watch video parts 2 through 4.

An Entire Wedding Shot On An iPhone And Processed Using Instagram

Kim A. Thomas, a photographer out of San Francisco, recently shot an entire wedding using just her iPhone. She processed everything using Instagram as well. The couple, Jonathan and Brandi, wanted her to do so by request. She never used an SLR for any of the shots. Her main camera was the iPhone 4s with an iPhone 4 as a backup. She did use an SLR mount for her lenses and a tripod. Take a look at the shots and let us know what you think of them!

Simple But Great Tip To Naming Your Photography Folders

There is no wrong or right way of naming the folders on your computer. It is really just a matter of preference and what works best in your workflow. Having been doing this for a number of years though I have experimented with quite a few different ways and this is by far the one I like best. Here's a quick video, less than 2 minutes long, that shares with you how I name my folders and why I chose to do it that way.

Adobe Gives a Sneak Peek at New Photoshop Feature Coming June 18

Adobe is hosting a special event on June 18 to show the world what's new in their Creative Cloud set of applications, but today they released a short video highlighting one of the features they're working on in Photoshop: a new way to make automatic selections based on pixels in focus against those out of focus.

How to Combine Focus Stacking and Exposure Blending for Better Photos

I have already written two articles about focus stacking here. The first article dealt with how I use automatic focus bracketing in the field, and in the second article, I shared my focus stacking workflow in Helicon Focus. To provide you with even more tools, I now show you how I combine focus stacking with exposure blending.

How to Create Luminosity Masks for Better Retouching

When learning about retouching, selections and masks should be on top of the list along with curves and brushes. But each of these tools have so many options, and it is hard to know the in and out of each of them. In this article, I will guide you through different ways to create precise and refined luminosity masks to help you improve your retouching skills.

Aftershoot: Hours Worth of Editing Reduced to Minutes

Working as a photographer for over a decade has helped me realize one important thing: I hate editing photos. I absolutely love every aspect of being a photographer, except for the editing. This is why Aftershoot has been incredibly useful to me.

Let Me Throw You A Curve and Get You Away from Prepackaged Presets

The hottest trend nowadays is Photoshop presets. Presets to mimic the look of films past, to add a bit of editorial edge to those mundane studio shots, or to just expedite the editing process. Many companies have come out with pre-packaged presets, treatments, and plugins to help users reach a new level of creativity.

Check Out This Brilliant Way To Remove Color Casts In Photoshop

Michael Woloszynowicz is a great photographer and retoucher. Not only that, but he is a great instructor. His videos always provide clear and detailed instructions on techniques many of us want to know. Recently, Michael released this video regarding the issue of color casts on models. Although Photoshop offers many tools to get close, this method is a truly a brilliant way of thinking.

Did You Know About This Tool in Adobe Lightroom?

I must confess, I don't use Adobe Lightroom to anywhere near its full potential. In this video, Nigel Danson walks through a lesser-known tool that is now a staple in his landscape photography.

A Simple and Accurate Way to Match Skin Tones with Selective Color in Photoshop

So it goes without saying that there are a ton of different ways to match skin tones across your subject or between images in Photoshop so it's often just a matter of picking the option that is most convenient or intuitive. Despite the wide array of choices, I seldom see people use the selective color adjustment layer for this task. The beauty of selective color is that it allows us to go off the numbers rather than intuition and achieve an accurate result in little time.

How to Use Lightroom Brushes to Contour Faces

It's amazing how adding just a little bit of shadows can drastically improve the depth of your photographs. Contouring faces is a little trick that can take a few minutes to do, but ultimately increases the overall image quality. I'm going to show you how to use the adjustment brush tool in Lightroom to act similar to the dodging tool in Photoshop, and then the key areas to brush for properly contouring a face.

5 Photoshop Tricks You Don't Know (And Why Photoshop is So Damn Amazing)

You know you've "made it" when your brand/product becomes a verb. With 25 years of history Photoshop has done exactly that and has become the undisputed champion of the photo manipulation/editing/post production game. I've been using Photoshop since version 1.0 back in 1990 (first as a tinkerer, then as a design QCM and finally as a photographer/retoucher) but despite my long relationship with Photoshop I still don't consider myself as having mastered it.

5 Affinity Photo Tools That We Need in Adobe Photoshop

For most things retouching, Adobe Photoshop sets the pace and has been the industry standard for decades. However, as alternative software improves and innovates, there are some features that Photoshop doesn't have that would improve it.

How to Balance Heavy Shadows and Bright Highlights in Lightroom

Golden hour or overcast skies usually offer the best conditions for capturing models while avoiding harsh shadows, but sometimes time and weather are against us and that’s when Lightroom can come to our rescue. Photographer Julia Trotti gives a quick lesson on how to balance your highlights and shadows.

Using Adobe Photoshop's New AI to Make Colors Pop

Adobe Photoshop has had most of its recent major updates centered around its AI editing tools. In this video, find out how to make the colors of an image more punchy by using a filter you might not think to.

Make an Impact on Your Images With Color Grading

Color plays a large role in the way we view an image. It can convey emotion, evoke a response, and set the mood. Understanding the basics behind how to use color in your images will assist in creating your signature look. Color can play a role in all the senses making sure your viewers feel the story behind the capture.

Tutorial on How To Create Detailed Grungy Athlete Portraits In Post Production

I've written about Glyn Dewis before on Fstoppers. He's a fellow Photoshop World Instructor, UK-based photographer, and has an amazing blog and youtube channel filled with great image post-production tips. In this tutorial, Glyn teaches how to add nice detail and grit to your portraits, as he did with his boxer portrait series featured here. Click to see the entire post to watch another tutorial video on this shoot.

A Technique to Bring Back Lost Details Out of Shadows

Sometimes your favorite shot out of a series would be perfect if only one little thing was fixed. For me, that is often shadows obscuring details I really wish were more visible. PHLEARN has released an extensive tutorial on how to get those shadows to reveal details in a way that doesn't look super fake, which an issue I have with other methods I have seen.

How to Improve Your Blue Hour Photos During Photo Editing

As you've learned in a previous article, a great time to photograph cities is during blue hour. But the blue hour often lacks dimension and depth in the sky. If you're lucky, you'll have some clouds that provide structure. But if you have a clear blue sky, it'll often appear flat. In this article, I show you a trick you can use to make such a sky more interesting and improve your blue hour photos.

Instagram 'Celebrity' Photoshops Himself with Actual Celebrities

Do you ever feel like you're not hanging around enough celebrities? Maybe you wish you were court-side at a Laker's game sharing an emotional moment with Kobe, or maybe you'd rather be wrapped around Kim Kardashian like couch upholstery? If any of these things are true, you might be Peeje T - a pretty creative guy with a pretty good sense of humor and a knack for photoshopping himself into pictures with the likes of Jay Z, Beyonce, Rihanna, Alisha Keys and Kobe Bryant, among others.

Create Noise-Free Images Using Exposure Stacking

Current cameras' sensors are getting better year after year. Unfortunately, they cannot create noise-free images at high ISO just yet. I am sure the day will come soon, but in the meantime, there is a very simple technique using Adobe Photoshop or Affinity Photo to create the illusion of a clean file.

Capture One Express: Straightforward, Powerful, and Free

What is Capture One Express? Simply put, it’s a totally free and simplified version of the Capture One editing software that still offers the same superior raw handling ability as the Pro version.