Make Your Subject Pop With This Simple Trick
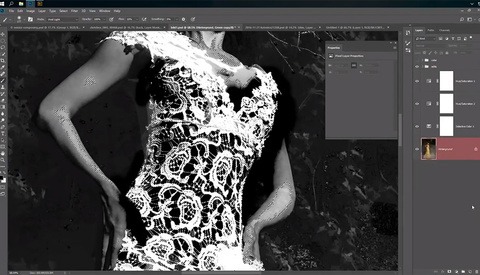
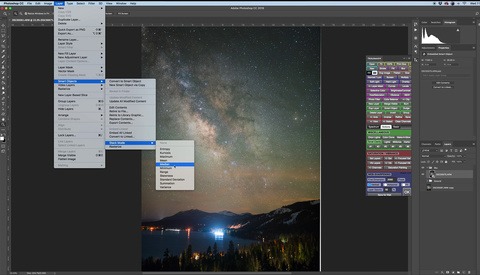
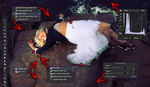
Sometimes the simplest of changes can have a drastic impact. In this video, you see how localized coloring and saturation can make your subject really stand out.
As professional photographers, we spend a great deal of time in post-production making our images look their best. Sometimes, we spend too much time there. So, let’s look at five quick tips to keep your Lightroom workflow efficient and effective.
Purists say they don't edit their photographs at all and they don't have to if the right camera settings were used. I'm fine with that philosophy if cheap old low-end cameras are used and they only can shoot in JPEG mode. Otherwise this approach is a complete waste of money on expensive cameras.
As with most processes in Photoshop, there’s more than one way to achieve a desired look. Black and white image conversions are no exception. Whether you add a black and white layer, utilize a plugin like Silver Efex Pro 2, or dare I even suggest resort to merely desaturating the image, the possibilities are abundant.
For many of us, gaining a stronger understanding of Lightroom's basic editing tools is always welcome. Learn how to develop your photos with the power of Lightroom’s built-in sliders.
What do you do when you get bored with photography? How do you funnel your creative energy when photography leaves your creative soul empty? Do you move on to something new or do you combine photography with something else?
Lightroom is much more than just a way to organize and cull your images. If you are new to Lightroom, or even if you have not looked into all the capabilities it has to offer, this video will guide you through easy tips to create more powerful images.
There are times when the kind of image you want to create just isn't possible on the day of a shoot. Don't let practicalities get in the way of your imagination; take advantage of stock images.
The jury might still be out on this, but it’s not looking promising.
Being able to automate repetitive parts of a retouching workflow in Photoshop directly translates into a saving of both time and money. This saving could make the all the difference in meeting or missing a deadline or making it home early to see your family. How can you make it a reality? Actions are certainly one option however they are severely limited to straight repetition of the original steps. Scripting is actually the answer that you have been looking for. Think of scripts as intelligent actions on steroids.
You can make your photos pop by boosting their color in Photoshop. But as with everything in Photoshop, there are many ways to accomplish similar results. I compare my go-to method to PiXimperfects method. Read on to see the compared results.
As photographers, we tend to care more about our cameras and lenses than the gear we use to process our images, such as monitors. It’s a shame, because it’s crucial too. Let’s find out in this review if the ViewSonic VP2785-4K could make your workflow better and easier.
HDR photographer Trey Ratcliff of Stuck in Customs demonstrates how he makes fireworks pop in his latest video using Skylum Software’s Luminar 2018. Skylum Software continues to gain traction with photographers as they look for alternatives to the Adobe ecosystem.
Since the beginning of my adventure into photography, Photoshop has been the go-to tool for cutting out a subject and creating complex masks. With ON1 Photo RAW, this process has become so much simpler.
Retouching is one of the main reasons most photographers use Photoshop. Understanding how and when to use the specialized tools can be trial and error until you find which works best for your workflow. A few tips on what each tool is doing behind the scenes can help with these choices.
Have you ever shared your photos on social media only to realize they appear completely different on your phone than they did on your computer? Here is a detailed video showing why calibration is necessary by comparing the same photo on three different monitors.
Creating selections and masks in Photoshop is a crucial part of any advanced editing workflow. Learn all there is to know about it with this video by Stefan Kohler.
A few weeks ago in a boudoir forum I came across a subject on what was the most time-consuming portion of most photographers' flow. The majority of the comments referred to culling and editing. So if you are looking to speed up your own workflow with minimal editing this video is for you.
Phase One has announced a new series of Capture One Style Packs titled "Latitude." The series contains two stunning packages: Latitude | Deep Forest and Latitude | Sunbound. These inspired timesavers adjust images quickly and easily while preserving exposure and adding creative flair.
It's not unusual for a software company like Adobe to continually add features and modify preexisting ones to programs with which we are already familiar. One of these features which recently got an upgrade, Profiles, is a tool created to add new looks and styles to your shots which can't be achieved by using the standard sliders or controls in the program.
You want your pictures and videos to look like Oscar movies, but you’re not sure how to do that? Lutify.me has got you covered with its latest update adding nine LUTs and presets inspired by famous awarded movies.
Tired with your same ol' process of color grading in Photoshop? Try out different color combinations in quick succession using these handy tips from PiXimperfect.
How do you go about photographing something as frequently photographed as the Wanaka Tree in New Zealand? Like many of the world's sights, the Wanaka Tree has seen slews of photographers trying for their version of the tree. But how can you make it your own?
If you want to learn to edit beauty, editorial, or fashion images like a pro, be sure to watch this video featuring Tina Eisen on how to such pictures with Capture One.
As photographers and retouchers, we tend to rely only on a few of the numerous tools and techniques available in Photoshop. So why clutter our workspace with tools that are useless when everything could fit on a single panel? It’s precisely why the Retouching Toolkit by Conny Wallstrom exists.
Whether you're a portrait, wedding, or event photographer, you undoubtedly encounter this issue: nobody has perfect teeth. But there is a perfect way to streamline the fix: create a Photoshop action.
Processing raw files accurately drastically reduces the amount of time spent in Photoshop. On June 23, learn for free from one of the top beauty photographers and retouchers, Tina Eisen, how to use Capture One to get as close to the final image as possible.
If you thought you couldn't use or rescue blurry, pixelated photos, think again. This tutorial will not only show you how to rescue and sharpen blurry photos, but also how to increase their size to prepare them for printing.
If you are an avid Fstoppers reader, you probably already know Brian Rodgers Jr. If not, he’s definitely a photographer you follow. His work is stunning and his approach to still life photography very inspiring. If you don’t believe me, this podcast will probably convince you.
Poor image quality cameras such as drones or older DSLR cameras benefit particularly well from this technique, but it does work with any camera.
Frequency separation has been all the rage in the retouching industry in the past couple of years. Hated, loved, criticized, acclaimed, it has seen it all. But do you really know how it works, what it can do, and more?
Client galleries have become the de facto way of distributing photos post-shoot, whether you are a seasoned pro delivering to a corporate client or helping out at a friend's wedding. Can you do this on a shoestring and is there an efficient workflow?
The BenQ SW271 is a new, high-end 27-inch 4K IPS monitor aimed at photographers who demand color accuracy at competitive price-point. In this review we will test both the SW271 and its larger cousin, the 31.5-inch BenQ SW320, to see if these big photography monitors lives up to their expectations.
Do you ever wonder how many photos you should deliver from a session? Here is why I believe that you are giving too many.
I'll be the first to admit that I am not an expert at Photoshop. There's so much I've yet to learn about the software, and it can be daunting. In this video from photoshopCAFE, 13 Photoshop wizards share tips at Photoshop World 2018.
If your portrait or product shot has a wrinkled, creased background, how can you easily clean it up and remove them in Photoshop? Learn how with these simple steps.
Using a high ISO setting to capture starry skies is a pretty common practice when shooting astrophotography, though such an ISO setting can result in a fair amount of noise in your image. This tutorial takes you through several processes in Photoshop to reduce the amount of noise in your final image.
If you're often frustrated by how little detail can be seen in your Instagram posts, this technique and free Photoshop template are for you.
When a photographer drops a new element into a composite photograph, one of the biggest challenges is using shadows to create believable depth to the image. This video from Colin Smith at PhotoshopCAFE helps make that task easier by breaking down the process into four simple parts.
Are you sick of seeing the same VSCO filters applied to everyone’s content on Instagram? Then differentiate yourself with this free app that relies on LUTs to edit your images.
If you’ve gone hiking out into pristine wilderness or to the tops of a mountain, bringing a tripod may not be at the right up there on your list of essentials. What do you do if you want to capture the beauty of the landscape in front of you, but also want a visually compelling image that is wider than any lens you may have?
Editing large batches of photos requires an efficient workflow, with headshots being no different. This great video will show you how to quickly and effectively edit a large set of headshots.
One of my biggest problems when using Lightroom is just how long it takes to start viewing my images. Thankfully, ON1 Photo RAW does things a bit different.
Famed photographer Trey Ratcliff over at Stuck in Customs shows how to jazz up your sun in one of his latest video’s using Skylum Software’s Luminar 2018. Skylum Software has gained quite a following as it works to dethrone Adobe as the go-to raw photo editor.
Adding to or accentuating the color tones in an image is a very effective way of telling a story, eliciting an emotion, or strengthening the aesthetic. In this short walkthrough, I'll explain how I can speedily color grade my images.
You probably use Lightroom because of the efficiency in processing batches of images, which in turn frees up more of your valuable time. But why use the software without the convenience of its many shortcuts, which save you time and make your work easier?
Underwater photography has become extremely popular with the increase of mermaid models. Getting the shot for a breathtaking underwater image is not as tricky as you may think.
MASV is a pay-as-you-go file transfer service, geared towards photographers and videographers. They’ve come a long way since I last covered them.
Ever wondered how to create your very own LUTs using only Photoshop? Look no further, Unmesh Dinda at PiXimperfect just released the perfect short and easy to follow tutorial for you.
VirtualRig Studio is the only software that allows realistic motion blur simulation, and it has many advantages over Photoshop's path blur. In this article, I will walk through the software and explain how to use it.