Indoor Natural Light: Learn the Basics
Hey, friends! I recently shot in a natural light studio and thought I would share some tips on indoor natural light for those of you who are interested. Enjoy!
Happy Halloween everyone! Today we decided to create a super simple, creepy image with some basic equipment. With 2 lights, a gel, smoke, a cardboard box, and some quick Photoshop we were able to create something almost anyone could easily reproduce.
How many times have you seen that popular meme that inaccurately says today is the "Back to the Future" day? Well today, October 21, 2015, is in fact the true date Marty McFly set as his future destination in his time traveling DeLorean from "Back to the Future II." To help celebrate this iconic date as well as the 30th anniversary of the original film, the production company Full Frame did this awesome photoshoot where they explore the capabilities of time travel. Check out the full behind the scenes video in the post below.
Many photographers rely on their 50mm 1.4 and 85mm 1.4 lenses to give that dreamy, narrow depth of field look to their portraits. These two lenses have become a staple for portrait, headshot, wedding, and boudoir photographers who enjoy the soft look that comes with a narrow depth of field and natural lighting. But what happens when you want to create a similar effect in the studio, where your strobes are often too powerful for shooting wide open? Today, I'm going to share with you a fairly unconventional lighting technique that will allow you to shoot your lenses wide open in the studio.
When I started out photography professionally, I only wanted to do weddings. It was what I loved (and still love). I thought studio work was so boring. With time, I was convinced to get my own studio and started doing portraits, beauty, products, and other genres. It was great. However, after two years, I am about to terminate my studio lease and will not take a new one. While I love shooting in a studio, I think the cons outweigh the advantages. Perhaps they will not for you. Nonetheless, let me show you what I learned from my two-year experience of having a studio.
UPDATE: Results from our reader's poll can be found here! Last week we released our head to head competition review between the Sony A7RII, the Nikon D810, and the Canon 5DsR ultra high megapixel cameras. Our test put all three cameras up against each other and compared their performance in terms of ergonomics, HD video, auto focus, ISO performance, Dynamic range, and overall image quality when used in the studio. Unfortunately a bunch of Sony users complained that our final studio test wasn't up to snuff, so we did what any respectable review site would do and brought back baby turtle. The new results might shock you.
I'm definitely NOT a studio photographer, but I respect and understand why for a urban running photoshoot like this one, it can make things a whole hell of a lot easier by doing it in the studio. Steve Brown shares some insight into his process in this behind the scenes video.
As a self-taught photographer, I’m an advocate of learning through doing. I didn’t study it, but I can imagine that reading all the Photography 101 books that are available still wouldn't prepare you for actually being on a set, with a model standing in front of you, and a team awaiting your creative direction. In my journey, experience has meant everything. Here are some of the things I’ve learned over the years that may help when shooting your own portraits.
It's surprising how many friends I know that live in wine country. And yet not surprising how many of them have taken up the camera. They all ask me the same thing. "Do you know of any good resources for how to photograph wine bottles?" Well now I feel like I can say that I do, as I point to this video by instructional photographer Karl Taylor and Broncolor photographer Urs Recher.
When I started out in portrait and beauty photography, I tried to have a makeup artist for most of my photo shoots. Why? Because I had always been told it would help my retouching. This is true in most cases. As long as you work with talented makeup artists, you will shorten the time spent in front of your computer. However, this is not the only advantage. Since I learned to do the makeup myself, I have discovered how having makeup done can help your photography reach another level. Noticing these benefits, I do everything to upsell my clients to get makeup done at the studio rather than having them doing it themselves. Here is why.
In this tutorial I will show you how to setup your studio strobes for full length portraits as we shoot an editorial style lighting setup. First we will look at the entire gear list we used and you can use for a similar setup, from the backdrop to the studio heads. I will breakdown our lighting. with lighting diagrams and explanation of WHY we are placing our lights where we are. Also, in this video tutorial we share some Behind The Scenes from our shoot day.
Early in the month we brought you a video that showed how Gonzaga Manso had created an in-studio pond to get the exact shot he wanted. This week we came across "The Unseen" series where photographer Lara Zankoul creates a water-tight room to capture beautiful and surreal images in-camera. A lot of work goes into a shoot like this but this behind-the-scenes teaser video makes it look fun and well worth the effort.
As part of CreativeLive's Portrait Bootcamp the mad talent and knowledge of New York City-based portrait/fashion photographer Lindsay Adler are put to use as she breaks down the practical definitions of light. Lindsay points out that once you can describe light by these 3 basic aspects (intensity, direction and quality) then you can start to understanding how much light to use, where it needs to be placed and what kind of modifiers are needed to achieve certain looks.
I remember meeting Peter Hurley for the first time. I walked into his studio and saw him shooting a client's headshot with 4 Kino Flo hot lights (normally used for video). I asked him why and he said "The quality of light is just better than strobe. It fills the pores on a human face differently." At the time I was intrigued, but I no longer believe it.
Amongst this years Broncolor Gen NEXT line up (a pioneering group of young professional photographers lighting up the future of photography) Gonzaga Manso throws in with his beautiful concept shoot, "The Pond". This photograph is meant to express the calm, sincere and deep love that comes from getting old alongside the person you love. But what maybe more interesting, for us inquisitive shooters, is the release of this behind-the-scenes video which details Gonzaga's elaborate and meticulous set-up.
We've all had horrible pictures taken of ourselves for our ID, passport, or drivers license. You might think your portrait turned out poorly because of the cheap camera, poor lighting, or you simply weren't ready. Well the truth is revealed in this hilarious video.
Holy butts. Sometimes the fact that I'm an artist and I'm allowed to get weird slips my mind. I don't have a boss, I'm allowed to create what I want, I'm allowed to try new things for the sake of playing, and I'm even allowed to start a blog post by saying "Holy butts." That rocks.
Have you ever wanted to create a dramatically lit portrait but you have felt limited by your lack of camera gear? Pye Jirsa over at SLR Lounge has just released a very technical video showing how you can accomplish complex lighting with just a single on-camera flash. The results are pretty incredible, and I would have never thought these images were created with such a simple lighting solution.
It has always driven me insane that I had to stock multiple sets of softboxes that are largely identical but designed for use with either studio strobes (of a specific brand) or speedlights (via some sort of proprietary bracket). I even jerry-rigged some disconcertingly terrifying setups over the years involving a few Justin Clamps to mount my speedlights onto speed rings. Unsurprisingly, things didn’t go very well. That is until I discovered Cheetah Stand’s Speed Pro MKII bracket, which is a hefty bracket specifically designed to help you mount a small flash into Bowens-style speed rings.
“Expect the unexpected” is great advice for anyone, especially for a photographer. Making the necessary preparations for a photoshoot is essential to success, but what about matters that are beyond your control? We will review three of the most common obstacles that can potentially derail your next session, and how to best handle them both preemptively and after the fact.
Elinchrom has been renowned for its light shapers for a long time. Many photographers have been using the Rotalux line of softboxes even on other, more expensive strobe brands such as Profoto or Broncolor. The Rotalux system was also known for its quick and simple way of assembling the boxes. A couple of months ago, the Swiss brand announced a new line of light shaping tools: the Litemotiv. They might look very similar to the Rotalux system, but they are very different in many ways. Elinchrom was kind enough to lend me both sizes — a 120 centimeter softbox and a 190 centimeter softbox — and give them a try. Here are my impressions after a month of use.
So a few weeks ago I found sometime to shoot a personal project, a summer inspired beauty shoot. The idea behind the shoot was to focus on summer and to play with bright and vibrant colors. Prior to the shoot a spent days experimenting with new techniques and different ways of introducing color into my shoot. In this article I want to share a couple of techniques I used to create colorful effects in camera and also how I recreated one of those effects in Photoshop.
In the final part of the Dramatic Beauty Portrait Tutorial, we will look at how I do my Black and White conversion. This image is a dramatic image so it calls for a punchy and high-contrast black and white conversion. In this tutorial, I will show you how I stack blending modes and adjustment layers to get my image exactly where I want it. You can follow these steps in your own images or use the techniques and customize them for your own use. In the video you will also see how to use layer masks to create targeted adjustments for your high-contrast black and white portraits.
For those of you who get into situations where you have limited time to set up, manually light and fine tune it to how you would like, well-known photographer Joe McNally shows how quick and easy using TTL can be when pairing an Air Remote with a Profoto B1 strobe unit. This would be great for event shooters, and setting up for quick portraits. Read on for two other videos on high speed sync and lighting ratios.
Since I started doing makeup on most of my projects, I discovered that some very basic makeup tools could have helped me in a big way on previous shoots. Before learning about makeup I had absolutely no clue whatsoever on where or even how to apply some very simple cosmetic products. Looking back now, I see how much time I have lost in Photoshop not knowing these simple things. My goal with this article is not to teach you makeup from A-to-Z but rather to give you a few easy tips you or your models can use to diminish your postproduction time. Less time in front of the computer means more time behind your camera, and who does not want that?
In my opinion, mastering negative dodge and burn is the key to any beauty retouch. There are many steps and many hours that go into a great retouch, but negative dodge and burn is as essential, if not more so, than any of them. The term "negative dodge and burn" is one that I first heard from fellow retoucher Pratik Naik. It was the concept of having a specific process of removing distractions and smoothing tonal transitions through dodge and burn that was responsible for one of the biggest jumps in my own personal retouching game.
From St. Louis’ Bruton Stroube Studios comes the impressively cinematic tale of food preperation as it battles the elements within the kitchen. At just over a minute in length, “Cooking Up A Storm” manages to breathe an extraordinary amount of drama and depth into the culinary practice. This short film is testament to what a skilled production team and sound designer can bring to seemingly oridinary situations.
In Part 3 of the Dramatic Beauty Portrait Tutorial, we will finally get into the first main step of the skin retouching process. Basic skin retouching involves addressing subtle skin and texture issues on our portrait images. We will not only look at techniques for skin retouching in Photoshop, but also discuss the theory behind our decision process during the retouching process. I will also show optional techniques for those looking for quicker or alternative options during their portrait or beauty retouching. In case you missed it, during Part 1 of the tutorial we went over the lighting and shooting of our image and in Part 2 we looked at the "pre-editing" process.
Anyone who likes to bring a light or two on-location knows the frustration of wanting soft, controllable light that won't weigh you down or break the bank. The Westcott Apollo Orb is, without a doubt, one of my favorite lighting modifiers. As you'll see below, the Apollo Orb has just about every feature you could ask for in its unique, somewhat-brolly-box-style design, all at a modest price point.
Zach Arias has a new educational site called DEDPXL where him and a group of his friends write on their experiences, struggles, and successes. Commercial Photographer Sid Ceasar is among those writers. A few months ago he produced a video appearing as Sid "The Muppet" Ceasar and talks about inspiration, getting out and making new work, and why surrounding yourself with creative people is so important.
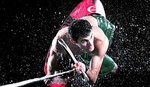
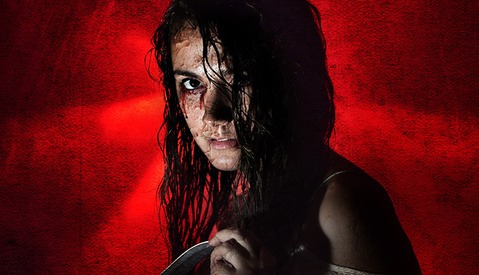
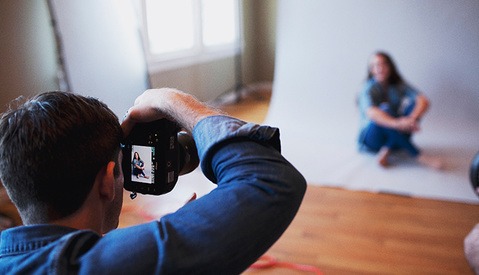
A couple of weeks ago I had a chance to shoot with the Broncolor Siros Monolights for the first time. Until now, my light of choice has been the Profoto D1. I, like many of you, have seen reviews on Broncolor's new monolight, and like many of you as well, have been a bit skeptical about their delve into competing with Profoto's D1 and B1 Series for the high-end monolight market. The Siros is available in two models, a 400W/s monolight and an 800W/s monolight, and for this shoot I used five Siros 800s. In this article I will give you my complete lighting setup, gear list, a retouching preview, and complete review of my experience with the Siros Monolight and BronControl app.
Beauty photography is something that I have become drawn to over time. Setting a mood, imagining a makeup style, and finding or even creating props to fill the frame with my model’s face is something I came to love more than anything else. In any genre of photography, I feel like it is important to develop a style that is recognizable. May that be retouching, posing, lighting, or something else, if people can tell you took the picture it means you have developed a signature style. For my beauty work I wanted to create a signature lighting setup that would be easy to recreate wherever I would go, no matter the condition or the place the shoot would take place in. Here is how I created it and how you can recreate it as well to make it your own.
Recently I went to New York City to do a week of headshots. As many of you know, part of my cinematic style involves shooting outdoors, but flying from Los Angeles to New York City to put this on meant I couldn’t rely on the weather. Figuring out how to translate the look and feel of my style indoors was the only way to make it a success. As I’ve had many questions about how to make this look happen inside for those that can’t always be outside, I decided to share my own experience with you.
In Part 1 of our Dramatic Beauty Portrait Tutorial, we looked at the lighting setup, gear breakdown, and shooting of our dramatic beauty shoot. In Part 2 of the tutorial we will now look at two different ways of exporting and preparing your image for retouching. The first method involves creating versions in Lightroom and exporting directly to Photoshop. The other method utilizes Adobe Camera Raw and the ability to make variations within Photoshop. I will also discuss the overall goal of our pre-edit stage.
Coolors is a fantastic new app that I stumbled across the other day. It is an incredibly easy and intuitive way to generate a beautiful 5 color palette for any situation. Primarily developed for designers it has instant appeal to us photographers. We deal with colors in most of our work and knowing how to match and complement effectively can make or break the images we create.